Date: May 21, 2020
Post by: Jody Peters1 and Quinn Thomas2
1 University of Notre Dame, 2Virginia Tech
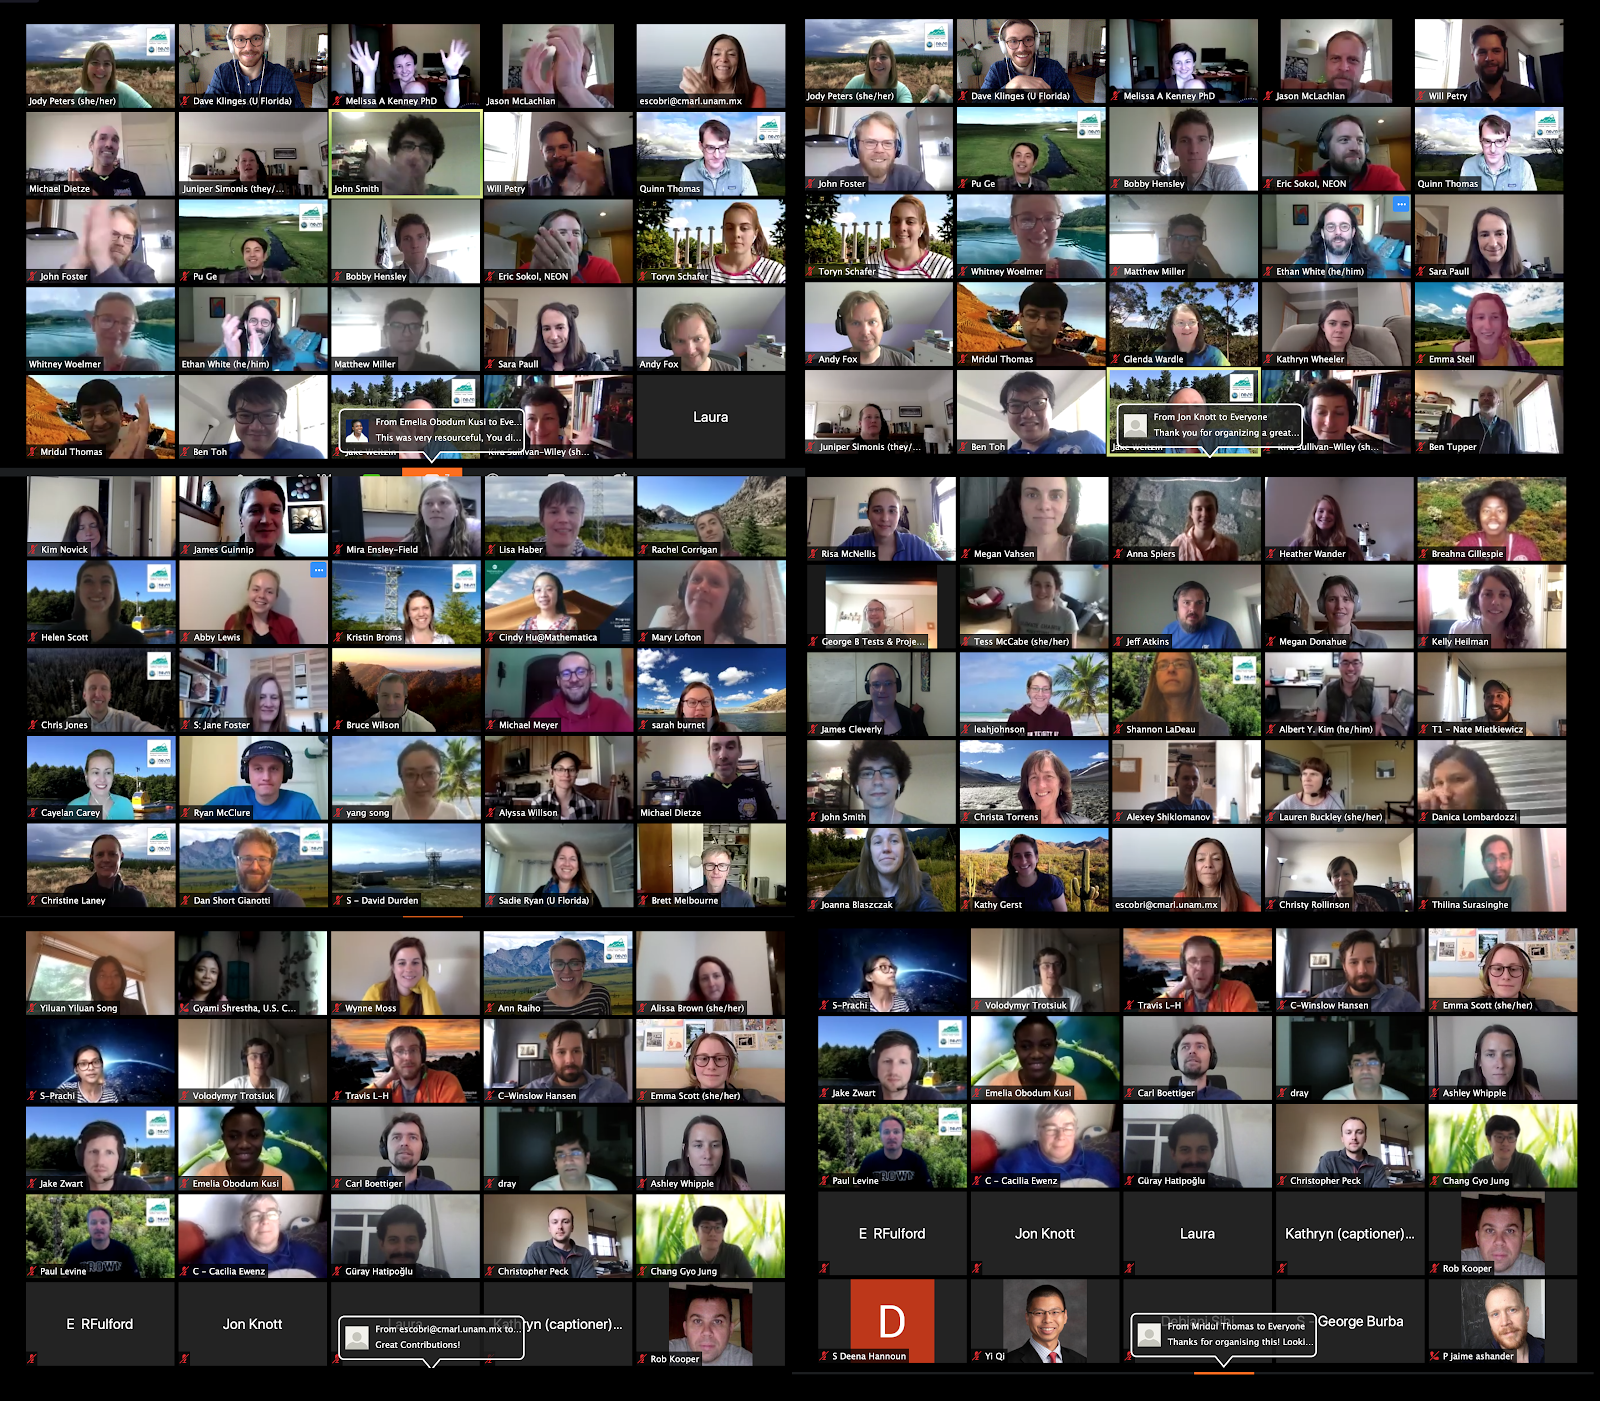
On May 12 and 13 our NSF-funded EFI Research Coordination Network (RCN) hosted a virtual workshop, “Ecological Forecasting Initiative 2020: Coordinating the NEON-enabled forecasting challenge”. This workshop replaced the three day in-person workshop that was scheduled at the same time, but which was canceled due to COVID-19. Going virtual allowed us to increase our participation and diversity. We were originally space-limited to 65 in-person participants, but with our virtual meeting, we had a little over 200 people register to access the workshop materials, with 150 individuals consistently joining on Day 1 and 110 individuals who consistently participated on Day 2. We also welcomed participants from around the globe with almost 10% of participants calling in from outside the U.S. And instead of being limited to 15 graduate student participants, we ended up with over 50 graduate students who participated in the meeting. While EFI has been using Zoom from the beginning and the EFI-RCN leadership committee members are constantly on Zoom for calls and online courses, this was a much larger gathering than any of us had organized previously. To help others as their workshops are embracing the virtual format, we reflected on the key elements that allowed the workshop logistics and technology flow smoothly. We hope you find our tips useful! If you have any additional questions feel free to reach out to us at eco4cast.initiative@gmail.com.
Prepping for the Meeting
- Get input from many perspectives. There are a number of great suggestions online about hosting virtual workshops. To prepare for the virtual format, multiple leadership committee members took a free 1 hr class on running virtual scientific meetings. You can find the video and slides from the class here https://knowinnovation.com/2020/03/you-too-can-go-virtual/. Alycia Crall from NEON was hugely helpful with ideas like QUBES and Poll Everywhere. Lauren Swanson from Poll Everywhere provided a tutorial on how to use the different features of Poll Everywhere and helped us to test the polls before the workshop. Julie Vecchio, from the Navari Family Center for Digital Scholarship for the Hesburgh Libraries at the University of Notre Dame, shared an example slide deck and script for sharing virtual logistics at the beginning of a workshop. And Google was a great resource for finding additional input along the way.
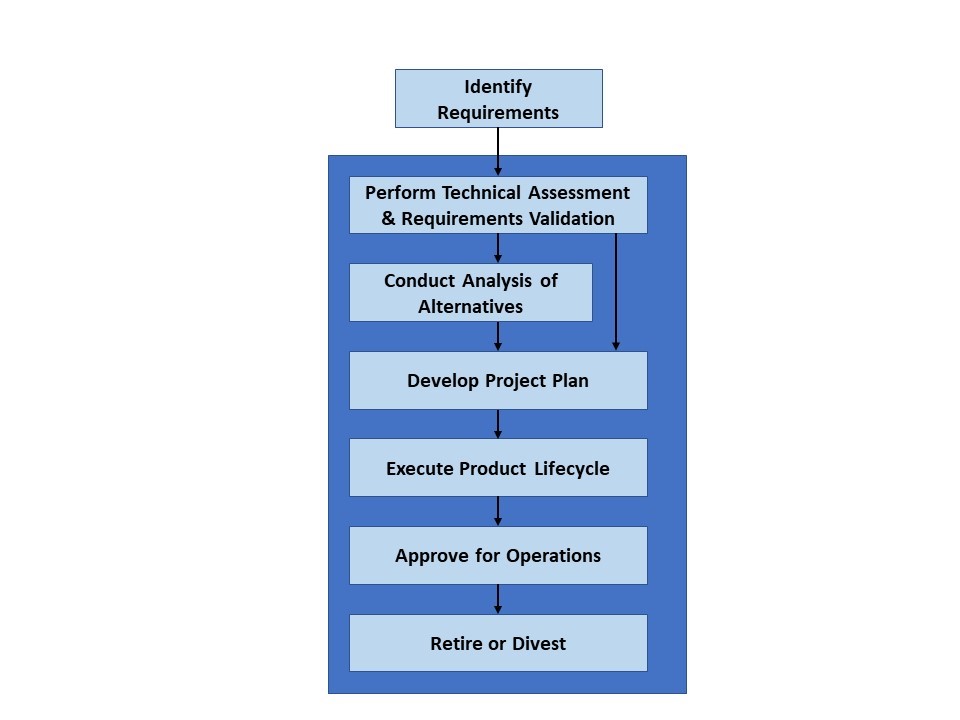
- Scale your goals to the format and your objectives. Our goal for the original in-person meeting was to finalize rules for the NEON Forecasting Challenge but we knew that this was not possible virtually. However, the virtual meeting allowed us to have more people and more perspectives for idea generation. Therefore, our goals shifted to brainstorming so that we could leverage perspectives from the diverse attendees. We now have a ton of work to do synthesizing the input but we have a better pulse of what the community is interested in. Recognizing the challenge of engaging attendees virtually over long periods of time, we reduced the original 3-day in person meeting to a 2-day meeting with a schedule that was conducive to participants from east to west coasts of the U.S.
- Virtual meetings require as much or more prep than in-person meetings. Be prepared for a lot of planning before the meeting.
General Meeting Set-up
- Don’t go all day. Our first day was 6 hours and the second day was only 4 hours and the hours were set to accommodate people from the U.S. east and west coast time zones. Unfortunately, there is no good time for all global participants, but we were thrilled to see so many participants who woke up early or stayed up late to join us from outside the U.S.
- Incorporate plenty of breaks. Virtual meetings are more tiring than in-person meetings. We had two longer 30-minute breaks that corresponded to lunch-times on the U.S. east and west coasts as well as shorter 15-minute breaks spread throughout both days.
- Have a production manager for the meeting. This person focuses on set up and running the technical logistics. For example, this person stays in the main room during breakouts to provide assistance and oversee the timing of activities. Having a production manager allows the meeting lead (i.e., project Principal Investigator) to be the M.C. of the meeting and do real time synthesis of the ideas without having to worry about meeting logistics.
- Create a minute-by-minute script for the entire meeting. This includes both the public Agenda and the behind the scenes tasks. For example, we wrote out the messages that would be sent through Zoom Chat/Breakout messaging with the time that each message would be sent. You should be able to articulate in writing what is going to happen at every moment of the meeting before the meeting starts and assign who is going to do each task.
- Pre-record talks and add edited closed captioning. This prevents issues that come with live talks like bad mics or bad connections. This also keeps the meeting on schedule and avoids the awkward need to cut someone off. We felt the talks were better because they were pre-recorded and, for the talks that presenters agreed to share, we now have an excellent resource for folks that missed the meeting. The pre-recorded talks may require editing, so find someone with resources and time to make edits prior to the meeting. We made playlists for each plenary session available as unlisted videos on YouTube for any workshop participant that had connection issues while the videos were being played.
- Be prepared to pay for a closed captioning service so that the meeting is accessible. In the registration form for the meeting, ask if anyone needs CC and if they do, hire a service. We were able to find a service through our university (Virginia Tech) vendor system that worked well (www.ACSCaptions.com). The production manager moved the captioner to be in the same Breakout as those that requested the service. CC is also nice, because you get the full record of text right after the meeting, instead of waiting for the Zoom transcript to come through, plus the captioner’s transcription is better than the automatic Zoom transcript.
- Use hardwired internet. Our production manager/meeting host used a computer that was connected to the internet via a wire – this will reduce the chance that the central person loses connection.
- Plan for leadership team meetings during the workshop. The leadership committee met for 1 hour before and 30 minutes after the meeting each day to go over last minute logistics and any adjustments that were needed. Set up a separate Zoom meeting for these calls to avoid participants joining at times when you are not prepared for them.

- Zoom worked great. While we know that there are other conferencing platforms, we used Zoom Meeting with a 300 person limit, hosted through the University of Notre Dame. We chose Zoom Meeting over Zoom Webinar, because we wanted the ability for workshop participants to interact during breakouts. Plus it was provided by the University, and did not require the additional set-up or payment that Zoom Webinar required. It worked very well. There were some individuals that could not access Zoom. Therefore, we also streamed the workshop from Zoom to YouTube and shared the YouTube live link with individuals in our group who had registered for the workshop materials.
- But Zoom can break communication lines among the host and leadership committee. Have an off Zoom and off computer way for the leadership team to communicate throughout the meeting (like text messaging to phones). It is important to turn off notifications on the host/co-hosts computer due to screen sharing and sounds, but that can leave the production manager or leadership team flying blind unless there is an alternative way to communicate. Leadership committee members that are in Breakout Rooms are unable to message the host in Zoom.
- Assign leadership committee members as co-hosts. Assign all leadership members as co-hosts and have them mute people who are not talking but have background sounds. Leadership members can also help with spotlighting the speakers and can also move from breakout room to breakout room if needed to check on how things are going.
- Give a brief Zoom training at the beginning. At the beginning of the workshop, use a slide deck (and a written out script to go with it) to introduce all the features of Zoom you want people to use. While many of us use Zoom regularly, not everyone is on Zoom all the time, and it is important that these folks feel comfortable so they can fully participate.
- Play videos directly from the production manager/meeting host’s computer. Make sure the videos are downloaded onto your computer hard drive and play them from there. We used a playlist that automatically advances to the next video. In Zoom’s screen share settings, make sure to click both the “Share computer sound” and “Optimize Screen Sharing for Video Clip” options. Do not play videos in Zoom from YouTube to avoid the video having to be played over multiple web services.
Zoom Breakout Rooms
- Keep Breakout Rooms small. To make the meeting feel smaller we only had a max of 9 people per breakout room. Using random sorting, as we did on Day 1, was a great way to meet different people throughout the group. We built in time for introductions during the breakouts because one of our goals was community building
- Clear and easy to find Breakout instructions. Have specific and easy to find instructions for each Breakout session. If possible try to spread the leadership team among different Breakout Rooms. In practice, this is hard because the production manager has to find them in the list of random Breakout Rooms and reassign (but see point 4 below and have the leadership members rename themselves). In reality, specific instructions that aren’t too complex will allow Breakout Rooms to work fine without a member of the leadership team. Our instructions were located in an easy to find place on the meeting website.
- Prepare for providing assistance getting into Breakout Rooms. Some people may not see their notification to join a Breakout Room pop up, so the production manager may need to walk them through that. Include a screenshot in the introductory Zoom instructions of what the Breakout Room assignment notification looks like so people know where to look.
- Give extra time if using manually assigned (non-random) Breakout Rooms. Manually sorting Breakout Rooms takes longer to organize so be sure to include the sorting time in your plans. The assigning and sorting can be done at any time during the plenary, it does not need to happen right before the Breakout Rooms open. Use the renaming feature of Zoom to ease the sorting. If everyone changes their Zoom name (under the Participants tab) to start with their group name or number (e.g., A1 Jody) it is much much easier for the production manager to sort.
- Create extra Breakout Rooms. When setting up the manually sorted Breakout Rooms, create additional rooms that may stay empty. There may be groups that want to breakout further and if you did not create an extra room when you set up the manually sorted rooms, these additional rooms cannot be added after the rooms are opened.
- Character limits for messages to Breakout Rooms. There is a character limit for the messages that can be sent to the Breakout Rooms, so keep them short.
- Breakout Rooms are unable to communicate with the production manager. When individuals are in the Breakout Rooms, they cannot use the Zoom Chat to communicate with the production manager in the main room or anyone else in the workshop who is in another Breakout Room. This is important to mention in the introductory Zoom instructions.

Communication throughout the Workshop: Poll Everywhere and QUBES
- Create a means for engagement. It is important for attendees to feel like they are involved so that the workshop isn’t a one-way delivery of information. We used an educational account of Poll Everywhere through the University of Notre Dame to help promote participation throughout the workshop in multiple ways, including brainstorming ideas with word clouds, submitting questions and voting on priority questions for panel members, and brainstormed priorities that also could be voted on.
- Define use of communication tools. Use the Zoom Chat for logistics and supplemental information and Poll Everywhere for Q&A. That way questions on science do not get lost in questions about links or timing etc. We also were able to download all the questions for the panelists to get their feedback on any questions that we did not have time for during the Q&A sessions. We will share this feedback with the workshop participants in the next month.
- Centralize meeting materials. We used QUBES as a platform to organize and share materials easily in a centralized location. The EFI-RCN QUBES site worked well because it was free (thanks NSF and Hewlett Foundation), easy to set up, and we were able to include links to videos, surveys, Zoom login, google documents, papers, etc. all in one place.